


Understand the basics before you drill

What is a shade sail and how does it work?
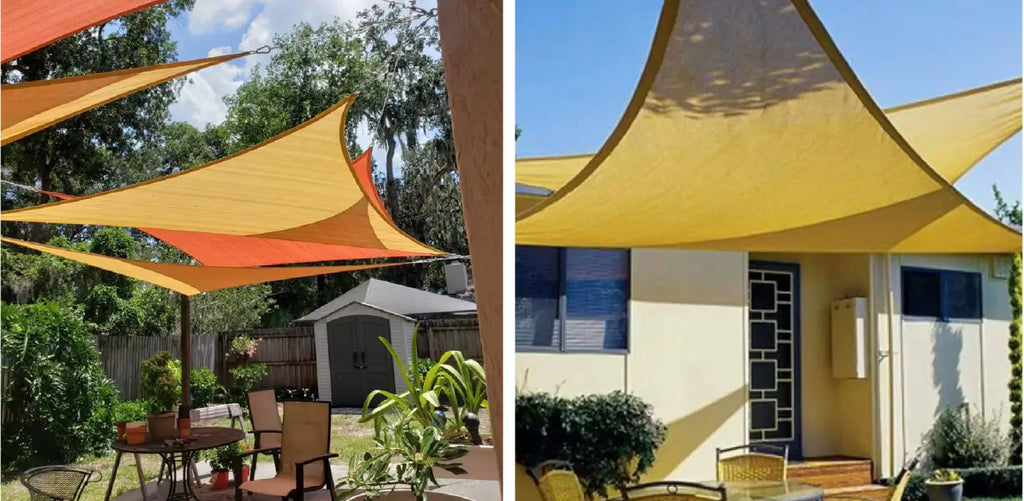
Shade sail is a tensioned fabric structure designed to provide sun protection in outdoor areas like patios, gardens, or decks. Its design mimics that of a ship’s sail, stretched tightly between anchor points. When installed correctly, it offers a stylish and functional solution for shade, with the added benefit of improving your home's exterior aesthetic.
Because it relies heavily on proper tension, the positioning and mounting hardware used are critical to success. Knowing the basics of how it distributes load and resists wind force will guide all your installation decisions.
Key considerations before starting
Before installing or attaching a shade sail to your house, take time to evaluate your wall’s structural condition, material, and exposure to wind. You should never attach a sail to surfaces like vinyl siding or fascia without proper backing. Instead, identify load-bearing points like wall studs, headers, or brickwork.
Also, think about sun orientation and desired shade coverage at different times of day. Taking measurements and sketching your setup on paper or using a tool from the Bunnings Workshop Community will help avoid costly mistakes and allow you to find the best locations for installation.
Choose the right attachment points on your house

Safe and unsafe attachment zones
Your home's structure determines what areas can safely support the tension and wind load of a shade sail. The safest attachment zones are wall studs, brick or concrete walls, and the top plate or header area below your roofline.
On the other hand, fascia boards, soffits, and surface-level siding are weak and should not bear force without reinforcement. Improper anchoring in these areas can cause long-term damage or even failure during a storm. Understanding your home's structure is essential before choosing where to install a shade sail.
Hidden structure detection
You’ll often need to locate framing hidden behind siding or drywall. Use a stud finder or borescope camera to map out anchor zones. Tapping on walls can help identify hollow vs. solid areas, but it's best paired with technology. For vinyl or rendered walls, confirm you can access underlying timber framing before drilling.
When in doubt, drill a small test hole and inspect what lies beneath. This step ensures you're not relying on surface materials alone, which can lead to poor connection strength and risk during high wind conditions.
When to use a mounting plate or bracket?
Mounting plates or brackets help distribute tension loads over a broader area, especially when direct anchoring isn't feasible. They are useful for corners, transitions, or when attaching to siding that covers solid framing.
Choose high-quality hardware made of stainless steel rated for outdoor use to resist corrosion and support heavy materials for shade sails. Brackets designed for fascia reinforcement can also make this zone viable when installed properly. For advanced installs, wire rope systems or custom plates may be needed to adapt the sail to your building's unique situation.
Select the proper hardware for your house wall type

Hardware kits and custom options
You can choose from pre-made shade sail hardware kits or source individual components to suit your needs. Basic components include eye bolts, turnbuckles, snap hooks, pad eyes, wire rope, and screws.
For wood and brick houses, lag screws or masonry anchors are required. Ensure all hardware is rated for high strength and can handle wind load. Avoid cheap zinc-plated items that rust quickly. Using stainless steel components from the start ensures a secure shade sail installation built to withstand outdoor forces.
Vinyl or rendered walls
Vinyl siding and rendered finishes are popular but tricky. Always drill through to solid timber framing, never into siding alone. Use a compression sleeve or backing block inside the wall for added strength. If you’re unsure where the studs are, remove a small section of siding for inspection.
Rendered walls may require special masonry anchors or chemical-set bolts. In both cases, consider using a mounting plate to distribute the load and avoid cracking or deforming the surface. Installing with the right hardware improves the long-term durability of your shade sail.
Corrosion and weather resistance
Outdoor hardware must endure UV rays, rain, and temperature changes. Stainless steel is the best choice due to its high corrosion resistance and strength. Galvanized steel is a more affordable option, but it may rust over time, especially near coastal areas.
Avoid mixing metals, as this can lead to galvanic corrosion. It’s also smart to check your hardware annually and replace any components showing signs of wear. Choose strong materials for shade sails to ensure long-lasting performance and safety.
Create optimal tension and angles

Why tension matters
Proper tension keeps the sail taut, prevents sagging, and reduces fluttering in the wind. A loose sail not only looks sloppy but can also trap water and put uneven pressure on your mounting points. Over-tensioning is equally dangerous, potentially ripping fabric or pulling out anchor bolts.
Striking the right balance requires understanding your sail’s shape, the distances between points, and the material’s stretch tolerance. Shade sails must be securely installed at each corner with the right tension to perform optimally in your outdoor space.
Proper angle for shade and drainage
To allow rainwater runoff, your shade sail must be installed at a sloped angle. A drop of at least 15–20 degrees between the highest and lowest corner points is recommended. This tilt not only improves drainage but also enhances stability against wind. Avoid perfectly flat sails, as they can trap water and sag over time.
Use a tape measure and spirit level to plan your high and low anchor points before installing. The right design helps maintain the integrity of your shade cloth and hardware.
How to use turnbuckles and pulleys for fine-tuning
Turnbuckles are essential for adjusting tension once the sail is installed. They allow you to incrementally tighten the setup without removing the sail. Pulleys can be used in more advanced setups to distribute force more evenly and make adjustments easier.
Always install hardware so it’s easily accessible after mounting. This ensures you can maintain proper load distribution and adjust for seasonal changes like spring winds or temperature shifts.
Step-by-step installation process

Dry run and mock setup
Before drilling, lay out the sail on the ground to understand how it will look and fit. Use temporary stakes and rope to simulate the angles and tension.
This dry run allows you to confirm the positions of anchor points, check for obstructions like a tree or eave, and avoid common alignment mistakes. It also gives you a feel for the overall aesthetic and function. Planning ahead ensures that your shade sail will serve your outdoor space effectively.
Drilling and mounting
Once your anchor points are finalized, use the appropriate drill bits and screws for your wall material wood, brick, or concrete. For brick or stone, masonry anchors and screw eyes are required, while lag bolts are suitable for timber.
Always pre-drill pilot holes to prevent cracking. If the mounting point is reinforced (like a bracket or plate), secure it tightly before adding tension hardware. Attach shade cloth or sails using high-quality bolts and hooks for a firm connection.
Hanging and tensioning the sail
Begin attaching the sail at the highest corner and work your way around. Connect the corners using your chosen mounting hardware, but don’t fully tighten yet. Once all corners are connected, begin tensioning turnbuckles in a cross pattern to evenly distribute force.
Ensure the sail is taut but not over-stressed. When the sail feels stable, lock all components and recheck each corner. This is a key step for a successful shade sail installation.
Final checks and safety test
After installation, give the entire setup a stress test. Pull gently on the sail, check all bolts and hardware, and listen for movement. If the sail flutters excessively or you notice any weak points, adjust tension or add reinforcements.
Consider how wind, rain, or debris may affect the installation over time. A well-executed setup will secure the shade sail against wind and improve the safety of your outdoor space.
Optional enhancements
Integrating lighting or plants
Enhance your shade sail with solar string lighting or hanging plants. This can turn your deck or patio into a relaxing evening retreat. Just be sure that added elements do not overload attachment points or affect the tension of the sail. Lightweight decor and well-balanced placement improve both aesthetics and safety.
Seasonal adjustments
Depending on your climate, you may want to remove or adjust your shade sail in spring or winter. Some systems include quick-release clips or removable pins that make this process easy. If snow or high winds are common, plan your setup so the sail can be taken down in minutes. Regular seasonal checks are a simple home improvement practice that prolongs the life of your installation.
Adding temporary posts or extension armsIf your house doesn’t offer enough anchor points, consider installing posts in concrete footings or attaching arms to fences. A common configuration is going from the roof side to Colourbond fence or from side to Colourbond fence. Make sure posts are heavy-duty and braced against load. This flexibility lets you install a shade sail even in less-than-ideal building layouts.
Advanced and radically new approaches

Smart anchoring with IoT monitoring
Innovative systems now allow you to monitor wind force and tension with smart sensors. These can be embedded in turnbuckles or brackets and sync with a phone app. The app can alert you if tension drops or a corner becomes unstable. This high-tech approach offers added peace of mind and brings home improvement into the future.
Eco-integrated shade sails
Next-gen shade sails are being designed with eco-friendly features like solar panels and rain collection. These sails provide shade while also helping power your lights or irrigate your garden. Such multifunctional systems are especially useful in sustainable outdoor design. When buying your next setup, consider options that do more than just block sun.
Common mistakes to avoid

Attaching only to fascia boards
Fascia boards may seem convenient, but they are not built to hold heavy loads. Attaching here can result in damage or detachment during storms. Always reinforce the area or drill through to the structural wall behind. Some fascia brackets help, but they must be used with proper screws and studs. This is a critical improvement to your installation process.
Over-tensioning the sail
Many DIYers mistakenly overtighten their shade sail, thinking tighter is better. This can lead to ripped material, pulled-out hooks, or cracked walls. Proper tension means the sail is taut but allows for minimal movement. Use turnbuckles with thread locking to avoid slippage. Every corner should share the load equally.
Not accounting for movement
Shade sails are exposed to wind, heat, and moisture, all of which can shift materials. Without flexibility, your system could fail. Use rubber washers or slightly angled hardware to absorb expansion. Think of your sail as a dynamic system. It should be able to flex and adapt while staying strong and secure.
FAQs

Can I attach to vinyl siding without hitting studs?
No. Always locate the studs behind the siding and use those for anchoring. The siding alone cannot support tension.
Is it better to use brackets or eye bolts?
It depends on your wall structure. Brackets spread the load and are better for weak points; eye bolts are fine for strong anchor zones.
How close should the sail be to the wall?
Allow 10 to 15 inches between the corner of the sail and the wall to accommodate mounting hardware and tensioning components.
Can I install it solo or do I need help?
You can do most steps alone, but it’s highly recommended to have help during tensioning and alignment to ensure accuracy and safety.
What materials for shade sails are best?
High-density polyethylene (HDPE) shade cloth offers durability, UV protection, and weather resistance. Choose the material based on your specific needs for coverage and design.


