

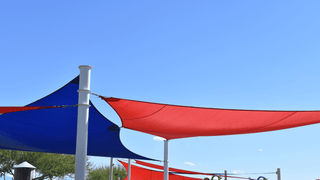
What a properly installed shade sail looks like?

A properly installed sun shade sail should look seamless and professional. From the corner of the sail to the tensioned wire rope, every element needs to be tightly secured. There should be no sagging, poor connections, or visible strain on the mounting points.
When the layout and structural integrity are right, it transforms your outdoor space whether it’s a deck or patio into a cool and shaded retreat.
This guide will walk you through installing a shade sail step-by-step, with practical advice on how to install different systems, from a simple triangle to more complex layouts with fascia support or even retractable awnings. For visual learners, we also recommend watching a simple tutorial video online for added clarity.
Key decisions before you touch a tool

Define your needs and constraints
Start by asking yourself what you're trying to achieve. Do you want a patio shade that offers all-day comfort? Is it a home improvement project you’re doing yourself? Are there restrictions on drilling into the fascia or deck post of your house? Understanding these factors will guide your choices.
You’ll also want to take into account your ground type whether it’s soft soil, concrete, or gravel at the base of your mounting posts. If drilling isn’t an option, fascia brackets and fascia support systems can be helpful. For wooden decks, installing steel or treated support posts can provide a secure foundation.
Choose the right shape and size
A triangle is the most popular sail shape for aesthetics, while square or rectangular sails provide more coverage. If you're installing a Coolaroo shade sail, check the manufacturer’s measurement guide.
Don’t just guess use proper layout tools to mark and measure your fixing points accurately. Each post must be positioned to create the correct tension across the corner of the shade.
We recommend using rope or string to outline your planned layout on the ground and test how it casts shade throughout the day. This low-cost technique will save you a lot of time and frustration before you make a purchase.
Mapping your anchor points
Mounting points are where your sail connects to a structure or support. These could be a wooden post, steel pole, fascia bracket, or a structural part of the house like a beam. If you're connecting to a fascia, use proper fascia support hardware to avoid damaging the structure. The connection must be secure and able to handle wind loads.
When anchoring into concrete, use a lag screw with an eye bolt. For wooden posts, pre-drill the hole to prevent splitting. Each post should be set in a post hole filled with concrete or gravel at the base. Always install posts at an angle away from the sail to help handle the pulling force of the strap tensioner or turnbuckle.
Tools and materials: What you actually need?

Core materials
You’ll need your shade fabric (preferably a UV-stabilized material like HDPE), fixing accessories, and mounting hardware. The mounting kit usually includes eye bolts, lag screws, D-rings, strap tensioners, and turnbuckles.
Don’t forget a garden hose and brush for later cleaning and care. For a permanent solution, use heavy duty materials, especially if your sail will be exposed to a lot of wind. For temporary setups, retractable awnings or adjustable sails can offer flexibility at a lower cost.
Optional but game-changing tools
Using a laser level, measuring tape, and ground stakes will help you create an accurate layout. Rope can help visualize your layout and simulate tension before installing the real thing. A wire rope tension gauge is also handy to ensure everything is tightly secured.
If your installation involves a deck or patio where drilling into the structure isn’t recommended, consider using deck post brackets or freestanding weighted bases.
Downloadable checklist
You can download our printable checklist for installing a shade sail. It includes all tools and materials, advice for each post type, and best practices for structural safety and sun coverage. It's ideal for first-timers or anyone putting together a new outdoor setup.
Step-by-step installation guide

Install your anchor points
Begin by determining where you’ll install your fixing points. For wood, use lag screws and eye bolts. For fascia mounting, make sure you use a fascia support bracket to reinforce the connection. Drill the hole carefully, insert your hardware, and tighten it so it sits flush with the surface.
For posts, dig each post hole at least 2 feet deep and fill with concrete and gravel at the base. Steel posts offer maximum durability, while wooden posts are easier to cut and customize. Be sure to mark your anchor positions ahead of time to maintain tension and layout symmetry.
Attach your fixings
Once your mounting hardware is in place, start putting together your fixing accessories. Connect the D-rings at each corner of the shade to the eye bolts using carabiners, strap tensioners, or turnbuckles. Tighten gradually, moving around each corner of the sail to evenly distribute tension.
It’s best to keep the sail taut without overstretching the fabric. Pulling too hard may damage the fabric or cause the connection points to fail. Use your rope guides or wire rope to test tension levels before final tightening.
Mount the sail
When all fixings are in place, lift the sail and attach each corner. This is usually a two-person job. Work corner by corner, attaching the sail loosely, then gradually tightening using the turnbuckles or strap tensioners. Check for even pull and no sagging at the corner of the shade.
Make sure the corner of the sail facing downward will allow water to run off especially if you’re not using waterproof shade fabric. This helps extend the lifespan of your sail and avoid the need for constant washing or care.
Test and adjust
After the sail is attached, give it a full inspection. Walk around the perimeter, apply some pressure, and test for movement. If you notice slack, readjust your turnbuckles or change the tension on the wire rope. For a professional finish, each post should feel rigid and stable even under load.
This is also a good time to connect any add-ons, like lighting or pulleys for retractable awnings. If anything feels loose or unstable, now’s the time to fix it.
Special cases and expert workarounds

Hanging a shade sail without drilling
If you're renting or simply can't drill, there are creative alternatives. Use heavy duty clamps for railings, deck post brackets, or weighted supports with gravel at the base. These allow you to install a sail without altering the structure of the house.
If you're installing a sail close to your home and can’t drill into the wall, fascia brackets provide a secure non-invasive alternative. Just make sure your fascia board is in good condition and properly supported.
Installing over uneven or irregular spaces
You can install a sail even if your space isn’t a perfect square. In fact, installing a triangle sail over a patio corner can create a modern, dynamic look. Use adjustable wire rope and fixing accessories to accommodate tricky angles.
You can also extend coverage by overlapping sails or using retractable awnings to fill gaps. We recommend marking your layout with rope first to ensure full coverage without sagging.
Multi-sail configurations
A lot of people don’t realize they can connect multiple sails together for better coverage. Just make sure each sail has independent fixing points, and avoid sharing posts unless they are rated for extra load. This gives you more layout flexibility and can dramatically improve shade coverage.
Installing multiple sails can also help direct airflow and reduce heat buildup on a deck or patio. It’s one of the best methods for covering large areas without a permanent roof structure.
Maintenance & seasonal storage

Regular inspection points
Check all mounting hardware regularly especially eye bolts, wire rope, and each post. Look for rust, cracks, or loosened connections. If the sail is pulling on the fascia or other structural elements, reinforce them or redistribute tension.
Regularly inspecting your setup helps prevent major damage and extends the life of your installation. If any element is under strain, take it down temporarily for adjustment.
Cleaning best practices
Washing your sail regularly with a garden hose and mild soap keeps it looking fresh. If your sail picks up stains or debris, follow the manufacturer’s care instructions especially for Sunny Garden Market shade sails or other specialty fabrics.
Avoid using strong detergents or pressure washers, as these can weaken the fabric over time. With proper care, your sail can last several seasons without fading or tearing.
Safe takedown and storage
When putting your sail away, clean it thoroughly and let it dry before folding. Store it in a dry, cool place ideally in a breathable bag or bin. If your sail was installed with a strap tensioner or retractable setup, it will be much easier to remove.
Keep all fixing accessories, screws, and instructions together in a labeled container for next season. This will save you a lot of time when you reinstall.
Frequently asked questions

1. What is the best way to install a shade sail on a house?
The best method depends on your wall structure. If you’re attaching the sail to your house, you’ll need strong fixing points like eye bolts mounted into wooden studs, concrete walls, or the fascia (with proper fascia support brackets).
Always use lag screws or expansion anchors rated for outdoor use. Avoid attaching to siding or drywall. For added safety and tension control, pair your fixings with a strap tensioner or turnbuckle.
2. Can I install a shade sail without drilling into walls?
Yes, you can install a sail without drilling by using freestanding posts, deck post brackets, or weighted bases filled with concrete or gravel at the base.
On balconies or decks, you can attach sails to steel railing using heavy duty clamps or anchor posts to the deck frame. This is a great solution for renters or those not allowed to alter their building's exterior.
3. How deep should I dig the post holes?
Each post hole should be at least 2 feet (60 cm) deep and wide enough to hold concrete or gravel at the bottom for drainage.
If you're in a windy area or using a large sail, go deeper (up to 3 feet) to provide extra stability. The base of the post should be set in concrete and slightly angled away from the center of the sail to handle tension effectively.
4. Why is my shade sail sagging in the middle?
A sagging sail usually means it's not pulled tight enough. Make sure your mounting points are correctly spaced and installed at different heights to allow for water runoff.
Use strap tensioners, turnbuckles, or wire rope to tighten the sail until the fabric is firm. The corner of the shade should never sit level with the center create at least a 20° slope to prevent water pooling and to keep the sail taut.
5. What kind of maintenance does a shade sail need?
Shade sails are low-maintenance but still need care. Clean the shade fabric with a garden hose, mild soap, and a soft brush avoid bleach or power washers.
Check your mounting hardware, fixing accessories, and rope tension every few weeks for signs of wear or loosening. Before winter or heavy storms, take the sail down, read the manufacturer’s care instructions, and store it in a dry place. This helps extend the life of your sail and hardware.
Going further: Beyond installation

Add-on accessories for extra comfort
If you're looking to extend usability, consider installing rope lights, attaching a garden hose mister, or pairing with retractable awnings for flexibility. These accessories are simple to connect and improve the comfort and utility of your patio shade setup.
Permits and regulations
Depending on your location, you may need to check your local home improvement rules or HOA regulations before you install a shade sail attached to your house. Always get written approval when in doubt.
Sustainability angle
Buying from eco-conscious brands or reusing old fixing accessories is a great idea. Recycled shade fabric is increasingly available, and steel hardware is easy to clean and reuse. Before you purchase, check the product's environmental certifications.
From planning to shade in 3 days or less

Shade sail installation doesn’t have to be hard or expensive. With the right layout, tools, and installation method, your deck, patio, or garden can be transformed into a cool retreat. Read the full instruction guide carefully, mark your fixing points, and take your time putting everything together tightly and safely.
Now that you’ve read through the full guide, we recommend watching a simple tutorial video and downloading our printable checklist. Whether you're doing a small improvement or a large patio makeover, the right advice and planning will make all the difference.


