
Installing a shade sail is one of the easiest and most stylish ways to transform your outdoor space. But what if you're dealing with a balcony, deck or patio, or even a brick wall, where you can’t dig a post hole or pour concrete? This guide will teach you how to securely install a shade sail without posts using smart DIY techniques and reliable hardware.
Whether you're a renter, a house owner avoiding drilling, or just want a user-friendly solution, this tutorial is packed with ideas, tools, and steps to help you get started.
1. Why install a shade sail without posts?

1.1 A smarter solution for limited spaces
Not every project allows for traditional posts or poles. If you're working with a balcony, garage, garden, or patio, digging a hole might not be an option. For renters, permanent fixtures like drilling into a wall or siding may not be allowed. A shade sail offers a friendly and non-invasive solution to enjoy comfort and style.
With some clever mounting hardware and anchor points, you can hang your sail from existing structures, fences, or walls without concrete, without posts, and without headaches.
1.2 Who this guide helps?
This guide is perfect for renters, homeowners, event planners, and DIY enthusiasts. Whether you're installing a Sunny Garden Market shade sail, working with a colorbond fence, or experimenting with custom supports, we've got you covered. This is your game plan to stay cool under the sun, while staying within budget and rental restrictions.
2. Getting ready: Tools and basics

2.1 What you'll need?
Before you install, gather the right materials for shade sails. Here’s your checklist:
-
Shade sail or shade cloth (UV rated, waterproof or breathable)
-
Stainless steel mounting hardware (turnbuckles, shackles, carabiners)
-
Eye bolts, brackets, and pad eyes
-
Strong rope or tension cables
-
Measuring tape
-
Drill, screws, anchors suitable for brick, wood, or metal
Check out our recommended tools and supplies to make this easier. Measure twice, cut once to ensure the perfect fit.
2.2 Safety tips and planning
Your shade sail installation will only be as good as your prep. Use a measuring tape to measure the distance between anchor points. Make sure each point is sturdy enough to handle the tension.
Avoid common installation mistakes like attaching to weak siding or overlooking wind patterns. Your mounting points should allow a taut sail with a slope of 15-20° to prevent sagging and allow rain runoff.
3. Best mounting points without posts

3.1 Walls, fascia boards, and eaves
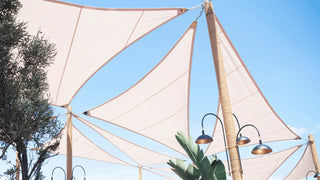
You can easily use your house itself as an anchor. Attach the shade sail to fascia boards, brick walls, or eaves using brackets and eye bolts. Locate a solid structure behind the surface (like studs or rafters) before drilling.
Mark each corner of the shade sail clearly. Start with one corner, then move diagonally. Keep a slight angle for drainage. If attaching near the roofline, you can attach shade cloth from roof side using a proper mounting bracket.
3.2 Using fences and existing structures
If you have a side to colourbond fence, reinforced timber fence, garage beam, or tree, those can be great supports. For fence installations, make sure the structure can support the pull and tensioning.
To install diy shade sails off pergolas or decks, attach hardware to existing beams. Reinforce any weak spots to ensure it remains secure in strong wind. You can add extra bracing if needed.
3.3 Railings and balcony-friendly hacks
Got a balcony? Use U-bolts, railing clamps, or tension straps to create anchor points without drilling. This is ideal for renters and those with small outdoor spaces.
Try using weighted stands or brackets you can custom build. Some users in the Bunnings Workshop Community have used planters filled with concrete to create stable poles.
4. Creative alternatives to digging a post hole

4.1 Weighted or portable bases
Use patio umbrella bases, sandbags, or planter-filled buckets to support vertical poles. Attach eye bolts at the top of the poles and hang the shade using turnbuckles or strong rope.
This method lets you install a shade sail without posts, even in places where you can't dig. It's great for rooftops or paved areas.
4.2 Cantilevered and tensioned setups
Mounting a sail using cantilevered arms or cross-cables from two structures can be effective and elegant. Attach to a tree on one side and your garage on another. Use tensioning tools like turnbuckles to keep the sail tight.
These structures are custom, but worth it for tricky spots where drilling is limited. Check your measurements and test every connection point.
5. Step-by-step installation

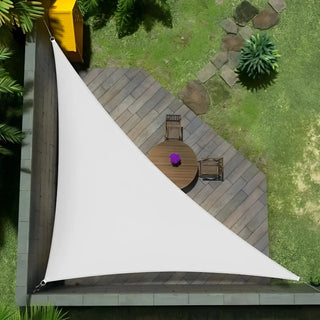
5.1 Measure and plan
Use a measuring tape to determine size and placement. Consider sun path and shade angles. Don’t forget to account for the extra length added by hardware.
5.2 Drill and mount hardware
Drill holes in your chosen anchor points using the appropriate bit (masonry, timber, etc.). Insert the screws and install the mounting hardware (pad eyes, eye bolts, or brackets). Double check that they’re firm.
5.3 Attach and tension the sail
Attach your shade sail using stainless steel shackles or carabiners at each corner. Use turnbuckles to gradually pull and tighten the sail.
Check for sagging and adjust until the sail is taut. This helps it withstand wind and prevents rain from pooling.
6. Maintenance and tips

6.1 Easy removal and care
Removing your shade sail is as easy as unhooking the hardware. Clean with water and mild soap. Let it dry fully before storing to avoid mold.
6.2 Common issues and tricks
If your wall or fence isn’t strong, consider adding a support beam. To handle wind, install shade fabric with wind slits or use a quick release hook.
A neat trick: use a deck eye plate on wooden decks for temporary installs. Want more ideas? Check out our video walkthrough or share your setup in the comments.
7. Final thoughts

With a little planning and the right tools for installation, you can easily install a shade sail anywhere no posts, no concrete, and no stress. This content should give you the confidence to start your next DIY shade sail installation and enjoy your outdoor space in style.